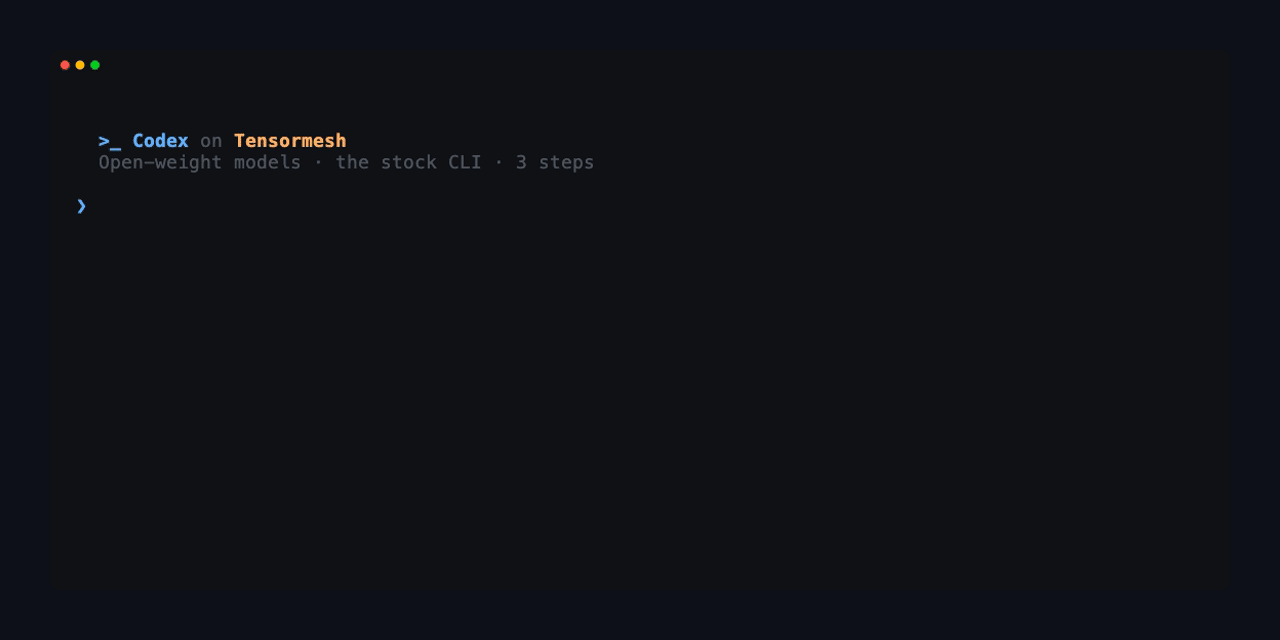
Run Open-Weight LLMs in Your AI Agent with Codex CLI & Tensormesh Serverless Inference


Use Codex CLI with open-weight LLMs like Qwen3-Coder, MiniMax and Devstral via Tensormesh serverless inference. 3 steps in 5 minutes.
If you build AI agents, you already live in a coding loop of prompt, tool call, diff, repeat. Codex CLI is one of the cleanest AI agent frameworks for that loop, which makes its one real constraint frustrating. Out of the box, Codex points only at OpenAI's hosted lineup, and that is effectively the end of the conversation about which model runs your agent. If your stack is built on open-weight models, you are left either rebuilding the agent loop yourself or accepting a model you did not choose.
Neither tradeoff is necessary, because stock Codex CLI (the same binary, with no fork and no plugin) can drive open-weight models against Tensormesh's serverless LLM inference API. You keep the harness you already know and swap in MiniMax, Qwen3-Coder, Kimi, Devstral, or gpt-oss with a single one-line flag with no GPU, no vLLM, no local inference server to babysit. The whole setup runs to three steps and about five minutes. Tensormesh handles Codex wire compatibility on the server side, pointing stock Codex at our open-weight model API endpoint is the entire integration.
This post is the fast path through all of it, showing why this matters if you ship agents, how to wire it up, how to switch Codex CLI models on the fly, and the operational details that actually bite during long agentic runs.
Why AI agent developers should use open-weight LLMs via serverless inference
The thing agents and app builders learn fast is that the harness and the model are separate decisions, and you want to be able to change one without rewriting the other. Most "use an open model in your agent" stories break that rule by handing you a new CLI, a new config format, a fresh set of footguns, and a serving stack to operate. This approach keeps the harness fixed and makes the model the variable instead.
- No new tooling. It is the same OpenAI Codex CLI you and your teammates already run, so there is nothing to learn, nothing to onboard, and no fork to maintain.
- No local infrastructure. Instead of standing up vLLM, managing GPUs, or warming weights, you point Codex at a serverless endpoint and start working.
- Model choice as a flag rather than a migration. Whether the task is reasoning-heavy, a long-context refactor, or a cheap and fast inner loop, you switch models with -m per invocation while the agent loop stays exactly the same.
- Real tool use rather than chat alone. Every supported model runs the full Codex flow from end to end, covering chat plus tool use, so the agentic behaviors you depend on (shell calls, file edits, and multi-turn planning) actually work.
If you have been waiting for a way to evaluate open-weight models inside a serious agent loop without spending a weekend on plumbing, this is it.
How to configure Codex CLI for open-weight LLMs in 3 steps
You will need an account and an API key (an ak-... key from Profile → API keys), Codex CLI installed via npm, and macOS or Linux with bash or zsh.
Step 1: Install Codex CLI (skip this if you already have it):

Verify the install with codex --version; this setup is validated against versions 0.128.0 through 0.131.0 for chat and tool use from end to end.
Step 2: Point Codex at Tensormesh. Codex reads its provider configuration from ~/.codex/config.toml, and if that file is currently missing or empty, the command below writes it for you:
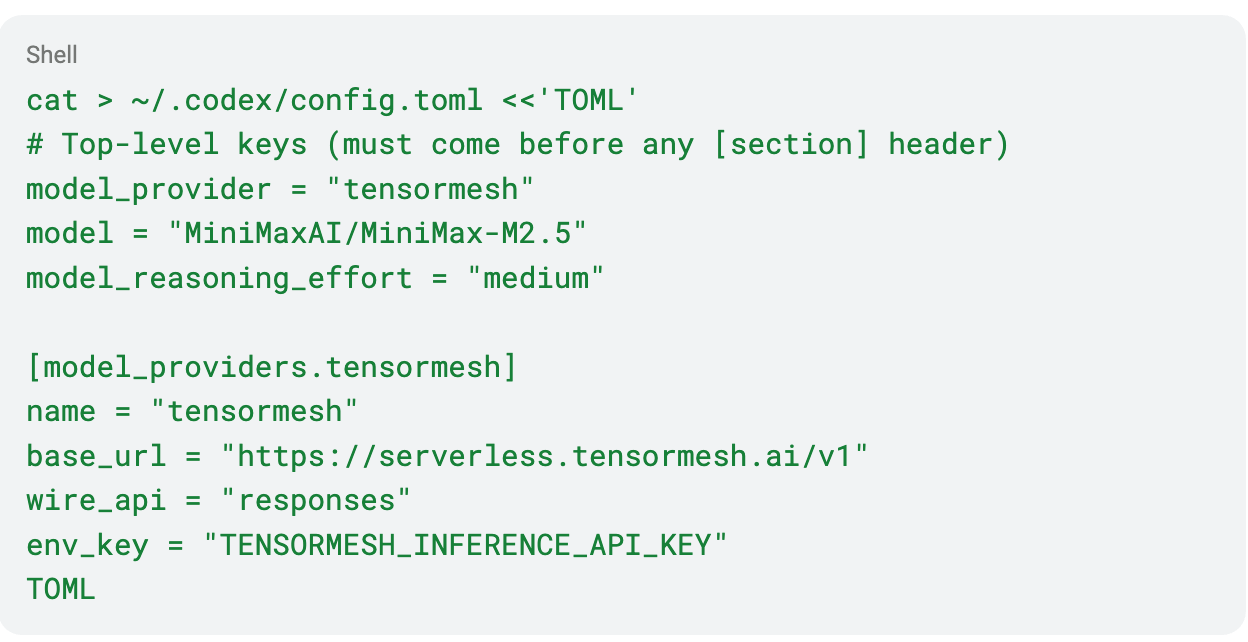
The first three keys make Tensormesh, MiniMax-M2.5, and medium reasoning the default for every codex run, while the [model_providers.tensormesh] block defines the provider those defaults point to.
One ordering gotcha is worth internalizing here: TOML does not reset table context on blank lines, so the three top-level keys must appear before any [section] header. If you are merging this into an existing config.toml, move model_provider, model, and model_reasoning_effort to the very top of the file, above every [...] block, since otherwise they get silently absorbed into whatever section precedes them.
Step 3: Set your key.

Add that line to ~/.zshrc or ~/.bashrc so that it persists across sessions. The key prefix selects which environment you hit, whether that is ak-dev-..., ak-staging-..., or ak-live-....
From there you simply run codex, which is the entire integration. There is no codex login step, because the env key tells Codex to read your credential directly and the OAuth flow exists only for OpenAI-hosted models, and there is no PATH surgery to deal with either.
How to switch LLM’s in your AI agent loop without changing code
Picking the right model for each task is half the craft of building good agents, so it pays to make switching cheap. The /model picker inside the Codex TUI lists only OpenAI's built-in lineup, which means Tensormesh slugs will not show up there, so you should press Esc to dismiss that picker and switch from the shell instead. This is a Codex CLI limitation that affects every third-party provider rather than a Tensormesh quirk.
You can override the model per invocation without touching your config:
If you change models often, for instance when you are benchmarking a few of them against the same task, aliases turn switching into muscle memory:
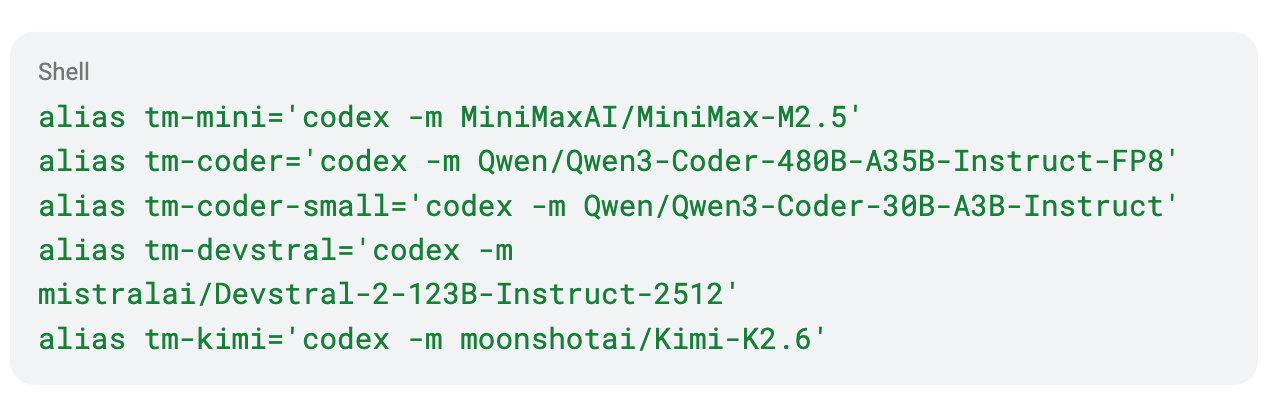
Once you reload your shell, running tm-coder from any directory starts a session against that model. If you would rather change the standing default, edit the model = line in your config.toml.
Supported open-weight LLMs for AI agents on Tensormesh
Every model below runs the full Codex flow, covering both chat and tool use, with MiniMax-M2.5 as the recommended default.
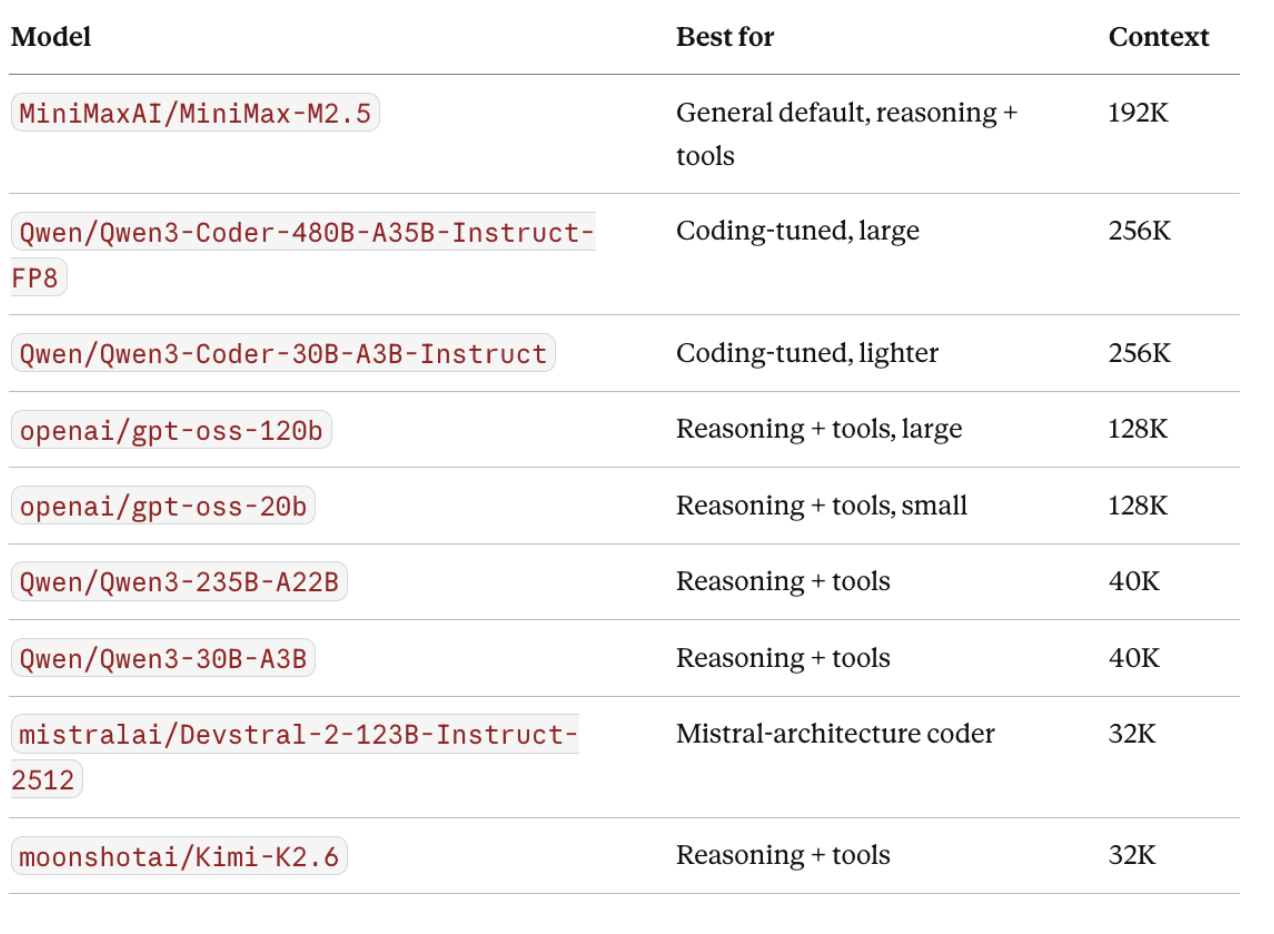
The GET /v1/models endpoint reflects what is live at any given moment, since cold models are hidden temporarily. If the list looks short, retry after 30 to 60 seconds, because the first request warms a cold model and subsequent calls are typically under five seconds.
Worth noting for the rest of your stack: every model here also works over /v1/chat/completions from your Python SDK, curl, and custom application code. Codex CLI is the one client that cannot fall back to that wire, which is an upstream Codex decision and the only reason the matrix above is specific to Codex.
AI agent runtime: sandbox modes, context limits, and exec behavior in Codex CLI
A handful of details start to matter more once your agent is doing actual work rather than just answering a single prompt.
Sandbox and approval modes. Codex defaults to a strict read-only sandbox that prompts before every shell command, which is the safest mode for exploring code. For day-to-day coding, -s workspace-write -a never auto-approves commands and allows writes inside your working directory while keeping the network off. When a task genuinely needs network access, such as fetching docs or hitting an API, --dangerously-bypass-approvals-and-sandbox opens everything up, so reserve it for a trusted machine running prompts you have already reviewed. The workspace-write and bypass configurations are mutually exclusive in effect, because workspace-write sandboxes write and disable the network at the same time, which is why you reach for bypass whenever you actually need network access. For non-interactive runs the -a never flag is implicit, so codex exec -s workspace-write is enough on its own.
One-shot exec has a stdin trap. The codex exec command reads stdin even when the prompt is already in argv, so it can look as though it is hanging while it waits for EOF. Redirecting stdin resolves it:

Plan for context compaction. Codex automatically compacts history as it nears the model's context window, which is a long way off on a 192K MiniMax run but fires much earlier in a session on a 32K or 40K model. Compaction preserves the topical context, meaning the documents you fed it and the task you are working on, yet it summarizes the earlier turns, so verbatim recall is lost in the process. If your workflow depends on the agent remembering a specific string you mentioned twenty turns ago, plan around that by running /compact manually at a clean point or by splitting the work into fresh sessions. In exec mode there is no banner for any of this, so the triggering turn simply takes roughly 30 to 60 seconds longer than usual.
Troubleshooting Codex CLI with third-party LLM providers
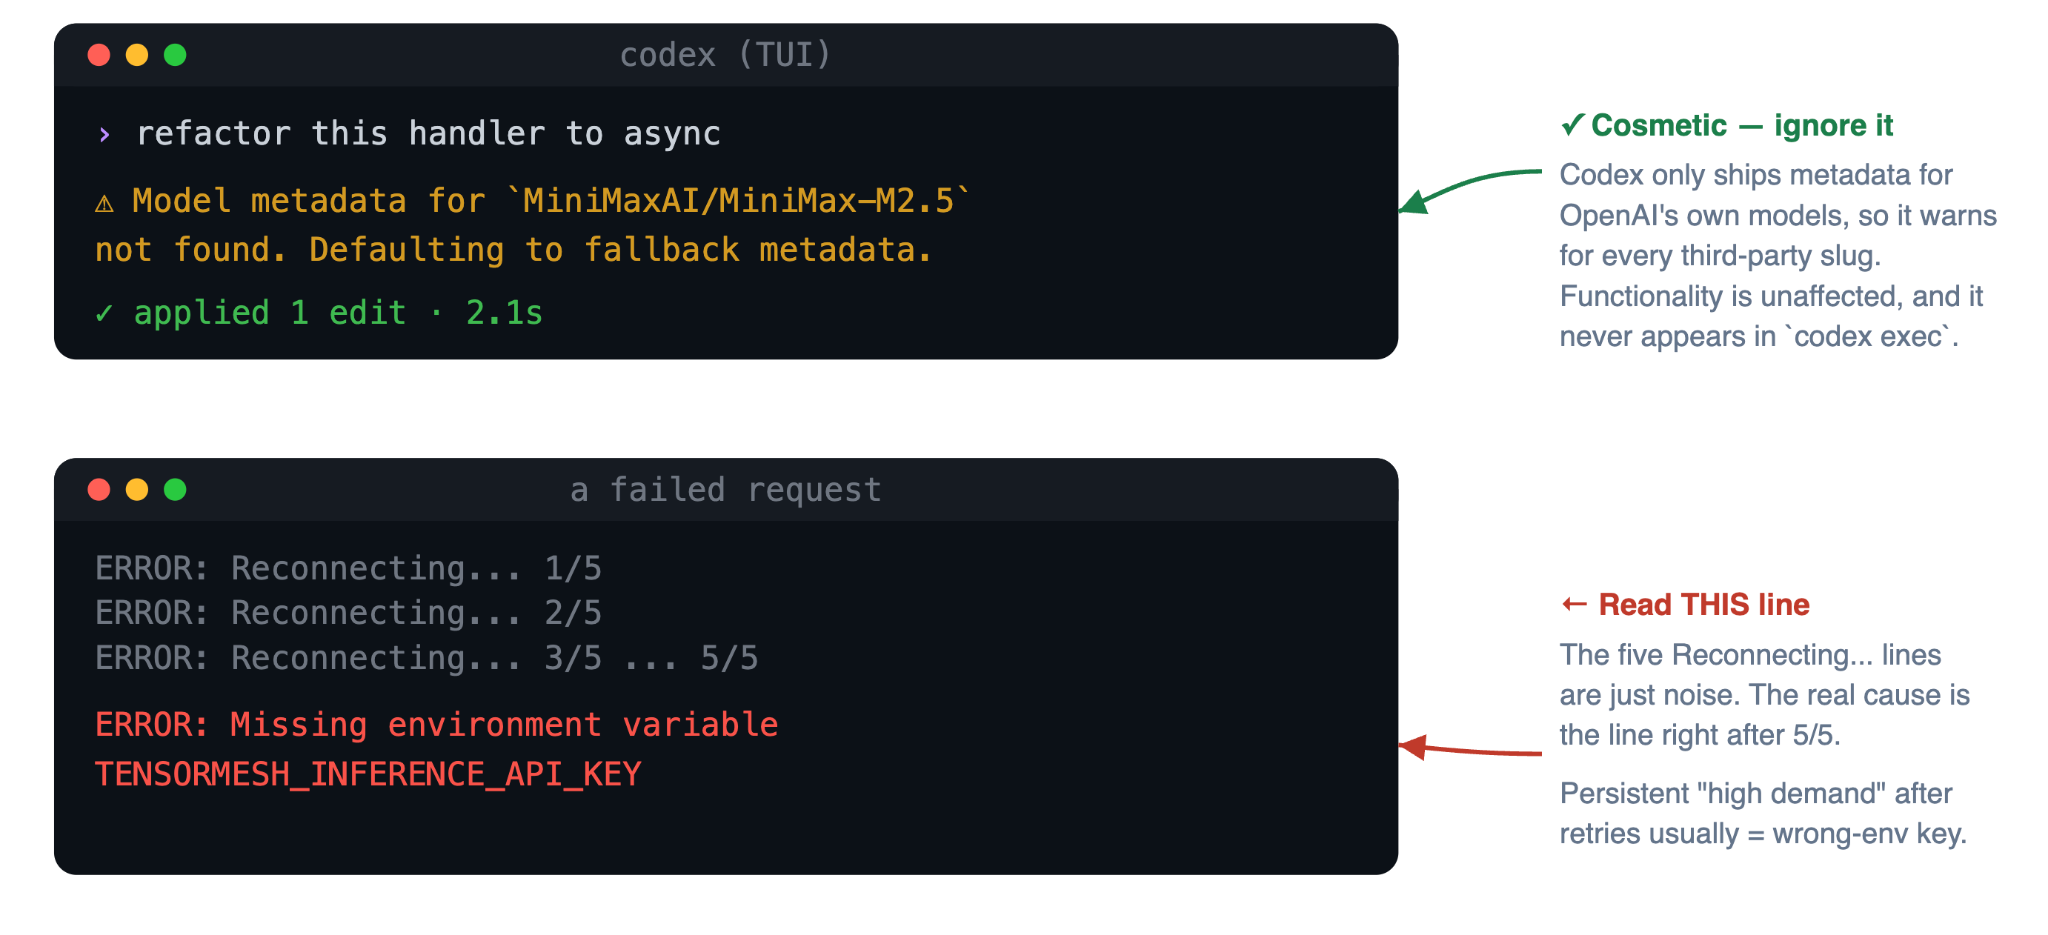
Two cosmetic behaviors look alarming at first and turn out to be completely harmless.
The TUI prints a "Model metadata not found" warning between every turn for any non-OpenAI slug. Codex ships with a registry of OpenAI's own models and falls back to default metadata for anything outside it, so the warning fires for every model supported here as well as for every other third-party provider. Functionality is entirely unaffected, and the warning does not appear in codex exec runs at all.
When a request fails, Codex retries five times before showing the cause:
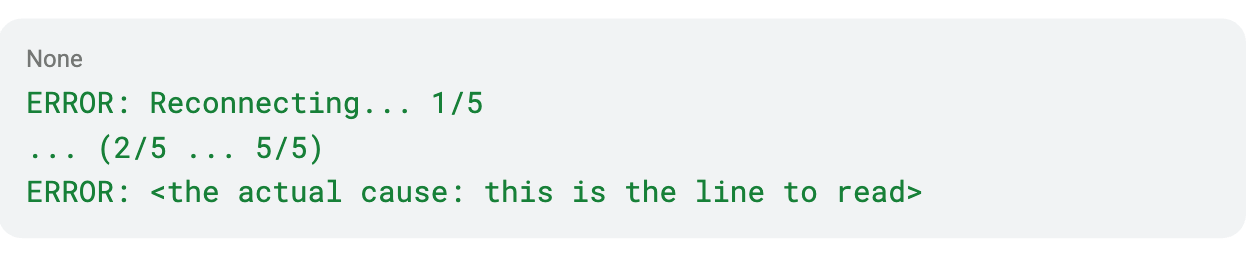
The five Reconnecting... lines are just noise, and the meaningful error is the line that appears right after 5/5. Among the usual suspects, a Missing environment variable message means your key is not exported in the current shell, while a persistent high-demand error after the retries is most often an invalid or wrong-environment key, since auth failures get reported as 5xx responses that Codex retries. A quick way to sanity-check the key is to call the models endpoint directly:

If that call errors, the key is the problem, so confirm the ak-<env>-... prefix matches the environment you are targeting. If a model slug returns a 404 even though it shows up in that curl output, it is simply cold, so wait 30 to 60 seconds and retry.
Start running open-weight AI agents with Codex CLI today
That is the whole pitch: keep the agent harness you already trust, treat the model as a flag instead of a migration, and skip the serving infrastructure entirely. Once you install Codex, drop in the provider block, and export a key, your very next codex session is running an open-weight model.
When you are ready to go deeper, the full docs cover per-environment keys, session resume, and the complete troubleshooting matrix. If you have questions or run into something that is not working, email saas-support@tensormesh.ai with the meaningful error line and the output of your codex --version.
Get started with Tensormesh
Try Tensormesh Inference in 3 simple steps with $100 credit
Step 1: Choose a model
Find the right serverless model for your workload using model, capability, and use case filters.
Step 2: Copy the API call
Use ready-made examples with your API key to connect through a familiar API pattern.
Step 3: Start sending requests
Run inference immediately with no servers to manage and no deployment step required